April 27, 2017
- Download & Attach VirtualBox Guest Additions
- Prepare CentOS
- Mount and Install VirtualBox Guest Additions
- Manually Configure Monitor
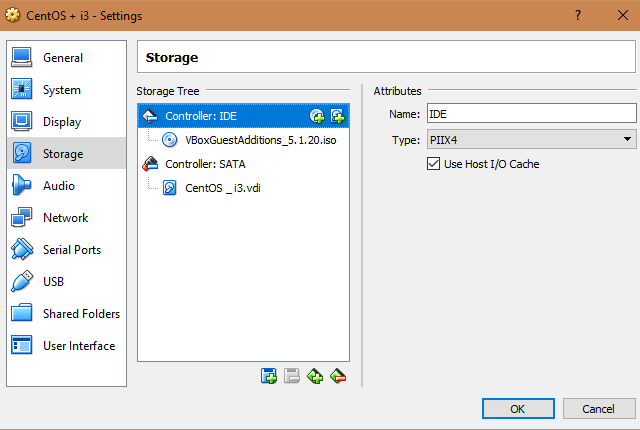
Download & Attach VirtualBox Guest Additions
- Download the appropriate version of VirtualBox Guest Additions. The latest would be VBoxGuestAdditions_5.1.20 at the time this article was written.
- Go ahead and attach the VirtualBox Guest Additions ISO as a device to the virtual machines storage. This is basically emulating a CD being inserted into our virtual machine.
Prepare CentOS
A few commands need to be ran in order to prepare CentOS for the VirtualBox Guest Additions install.
$ yum update
$ yum install dkms gcc make kernel-devel bzip2 binutils patch libgomp glibc-headers glibc-devel kernel-headers
At this point, if we try to mount and install VirtualBox Guest Additions, we’ll run into an issue where the install script cannot find or recognize the kernel. Below is a workaround I found for this issue:
Finding and Fixing Kernel Issue
$ ls /usr/src/kernels
The above will return what is in the /usr/src/kernels directory, which happens to be all of our kernel versions. Find
the latest version, something like 3.10.0-514.16.1.el7.x86_64, and truncate it to the 5XX number. You’ll end up with
3.10.0-514.el7.x86_64 in this case. Now install this kernel-devel before moving on.
$ yum install kernel-devel-3.10.0-514.el7.x86_64
Mount and Install VirtualBox Guest Additions
Here comes the easy part. Just mount the virtual cdrom and install the guest additions.
$ mkdir -p /media/cdrom
$ mount /dev/scd0 /media/cdrom
$ sh /media/cdrom/VBoxLinuxAdditions.run
This should run properly. After reboot, all guest additions will be ready to use. This includes the drivers, which is what we need to fix monitor resolutions.
Manually Configure Monitor
If you reboot and find your resolution is still not fixed, then you may have to manually configure your monitor with Xorg. It’s not as hard as it sounds.
$ ls /usr/share/X11/xorg.conf.d
The above will show us if there are any configurations pertaining to monitors. If not, simply create a configuration file.
$ vim /usr/share/X11/xorg.conf.d/10-monitor.conf
Configure your monitor however you like. This is what I ended up with:
Section "Screen"
	Identifier	"Default Screen"
	Device		"VirtualBox graphics card"
	Monitor		"Generic Monitor"
	DefaultDepth	24
	SubSection "Display"
		Depth		24
		Modes		"1920x1080"
	EndSubSection
EndSection
Finally, after rebooting the virtual machine once again, the resolution should be fixed to whatever you set it as.